Tuesday, August 26, 2014

Pallet recycling.

Background:
We recently bought a riding lawn mower and it came with a pallet.  So rather than just throwing the pallet out my wife suggested that I make some things about it.  

First is a "lobster crate" that she used to store gifts in for a bridal shower.  It now is used to store our outside objects, ie hammock.

Second was an end table for the front porch.


Piece descriptions:
Pretty self explanatory.  I took apart the pallet and used the pieces to construct the the two new items.  For this project I think I will let the photos do the talking.


Construction:
First I took apart the pallet.  This was more difficult than I had anticipated simply because of the staples that were in it.  After it was apart I sanded each piece to remove as much dirt and grime as I could.  Then I started to assemble each piece.  Altogether problem took about 10 hours.


Materials:
Pallet
Finish nails
Wood screws


Photos:
Pallet before deconstruction  and lawn mower

Pallet after deconstruction

"Lobster Crate"
Was assembled using finish nails.

"Lobster Crate" top view
Nothing fancy here.  The wood wasn't in good enough condition to make joints.

Table before finish
Was assembled using finish nails for the top and wood screws for the mid level support.

Table before finish


Other Notes:
N/A


Future Enhancements:
Paint or stain the table before putting it to use.

Things Learned:
Taking apart a pallet is a lot more difficult than I had anticipated.


Monday, April 28, 2014

Wife's Desk

Background:
My wife and I both wanted to upgrade the desks in our office.  She had limited desk space to work on her crafty projects.   Her desk was must simpler than what I have in mind for mine so I decided to do hers first.

I do have to apologize.  I lost a lot of the pictures from when I was putting it together.  I had a crash on my phone and some of the data got corrupted.  It may be better to read this post twice to fully understand it all.

Piece description:
Desktop:3-3/4" boards 8' long
Desk legs:3-3/4" boards
Vertical stiffener (back of desk): 1 -5"x3/4" board from leg to leg
Horizontal stiffener (Front of desk):1 -5"x3/4" board from leg to leg
Shelves: 1 3/4" board.

Construction:
Slots in desk top for legs.  Then glued legs to desktop. 
Slot in legs for vertical stiffener. Then glued stiffener to legs and desktop.
Built shelves then attached them to the leg via dowels.


Materials:
3/4" pine stock left over from another project
Lots of polyurethane 
Metal "feet"    

Photos:
The desk top being put together.
I made the desk top out of three 3/4" thick boards that are doweled and glued together.  I used my router table to join the edges first.  I realized that my clamps weren't long enough to put clamp the boards, so, I made a custom jig to keep them closed. You can see the jig in the picture.  The weight on top is to stop it from bowing up.
 
Side view of unfinished desktop.
You can see that I wasn't very exact in when I glued the boards together.  I had to square the edges when I was done.
 
Desktop.
 
 
Close up of desktop.
You can see the glue drops.  I had to sand these off when I was finished.

Desk legs.
For the desk legs I took a similar approach as the desktop.  They are comprised of 3 3/4" boards doweled and glued together.  I had the same problems with the clamps so I had to make some more jigs.

The other desk leg. 
I put my tool box on top to stop it from bowing up. 
 

Stiffener slot in the desk legs fix.
When I was routing the slot for the back vertical stiffener board, the guide fence slipped.  To fix this I routed off the bottom corner of the leg and glued I new piece of board to it.  Then rerouted the slot and used a trim bit to clean up the edge. 

Urethaned.

Front show of shelves.
In this shot you can also see that I routed the edges of the desktop with a 45 degree chamfer bit.
 
Side view.
Here you can see where I slotted the back piece for the shelves.  After I made that slot and glued the shelves and the back board together,  I attached the whole thing to the side of the desk.

 
Back view.
Here you can see two things:  Where I slotted the desk top for the legs and where I attached the vertical stiffener.  The leg is slotted for the stiffener (on the left) and the stiffener is also glued to the desktop (top).  I had accidentally over routed the slots for the legs, but the desk is going up against a wall so no one will see it.

Back view.
Here you can see the vertical stiffener (left), the slot for the leg (top) and the back of the shelving (right).  You can also see where the repair was made to the leg. It is slightly discolored.  I wasn't paying attention and glued the additional board such that the grains did not line up (oops).

Overview.
Here it is in the garage just prior to moving it in the house.

Top.
I was able to get it very shiny.  I sanded the top with 90, 100, 180, and 220 grit paper in that order.  This made it very smooth.  Then after every coat I sanded with 220 grit paper to get it smooth again.  I did this for each coat except the last.  There are 5 coats total.

Installed in the office.

You can see I had to make sure it was high enough to go over the top of my wife's drawers but low enough to fit under the window.  I used metal feet to ensure that I had adjustability.  You can also get a close up of the shelves.
 
If you look close, under the desk top you can see the vertical and horizontal stiffener. The horizontal stiffener  is just a 4"x3/4" board laid flat and glued to make the desktop a bit stiffer.


Other Notes:
I did much more sanding then I had originally thought I was going to do.  Trying to get everything really smooth was a lot more difficult then I had anticipated.

 
Future Enhancements:
N/A
 
Things Learned:
You can never make a desktop too stiff.
Always double check that your guide fences are secure.
Sand, sand and then sand some more.
Clean your brushes carefully after every use.  You will get a much better product in the end.
When making a repair, make sure the grains line up.


Tuesday, February 4, 2014

Computer Case Filter

Background:
The number one comment I got on the Custom Computer Case was that it needed a filter.  After opening up the case for the first time after the install,  I would have to agree.  In the short time it was there, combined with the limited about of dust I actually made in that time, there was a surprising amount of dust inside the case.

The objective was to have a system where I can replace the filter with out having to remove the entire case.

Materials:
3/4" pine stock (left over from another project
Crown Bolt 24 in. x 1/2 in. x 12 in. Plain Metal Expanded Sheet
Cut to Size Register Filter
1" narrow utility hinge
Roller Catch            

Photos:
 
Partial assembly of the screen frame.
First I cut 3/4" square strips of pine I had laying around.  I then mitered the edges. 
 
Close up of the groove for the screen.
The stock pieces were cut to size I ran them past the table saw to create an 1/8th groove to one side of the stock.  This is where I fit the screening.  I cut the screen with a rotary tool and 2 blades.  The screen was eating through blades like crazy.
 
Shot of the jig I used.
When I first tried to glue everything up I was just going to clamp in each direction.  This proved futile because it just kept slipping each way.  So,  I had to create a jig to hold the pieces in place.  I put paper towel down so that I didn't accidentally glue the frame to the jig.  I also put glue in the groove for the screen to secure the screen in place.   Once I let it set up the frame was very strong.
 

Screen installed.
Here you can see where I placed the hinged.  They are attached to the ledge that was already incorporated in the design of the computer case.  You will notice that the screen doesn't completely cover the left most fan.  This is because that portion of the fan is actually blocked by the leg of the work bench (bottom left of the picture).  So that fan is not as effective as the others.  In retrospect I should have accounted for this, but it's really not that big of a deal.  There is still plenty of air flow.

Here is a shot of the roller clasp.  This is what I used to ensure that the screen stays shut.  It's very secure.  Almost too secure.  It is somewhat difficult to open the screen door.

Screen closed with filter material in place.
As I mentioned before, you can see that the hinges are mounted to the face of the ledge .  Therefore,  I had to remove some material with a rotary tool from the ledge under the bench (It wouldn't fit underneath).
 
Other Notes:
I had to use multiple filters.  One filter was not large enough.  In the future I will for larger filter material.

 
Future Enhancements:
N/A
 
Things Learned:
Always use some sort of jig when joining things on an angle.
I should get a grinder if I plan on cutting metal again.


Thursday, January 30, 2014

Router Table

Background:
Based on all the excellent feedback I got from my brief 15 minutes of fame on hackaday.com I realized that making a filter for the computer case is probably a good idea.  But in order for me to do what I wanted to do I needed to make a router table.  Also,  I figured it would be a good tool to have in the future.   

I have limited space in the garage so I needed it to be foldable and storable.  So a traditional table would be out of the question.  However,  I did recently receive a gift from a family member.  It was a Dewalt Heavy Duty Miter Saw Stand.  So I figured it could double as a router table and an actual miter saw stand.

Materials:
  • Dewalt Heavy Duty Miter Saw Stand
  • 2-Mounting brackets
  • Craftsman 1 1/2 HP router
  • 4'x8' sheet of 3/4" plywood
  • 3/4" plywood (left over from another project)
  • 1/4" plywood  (left over from another project)
  • 2-1/4" carriage bolts (5" Long)
  • 2- lock nuts
  • 4 1/4" machine screws
  • misc. 2x4 (left over from another project)
  • 1/4" wood dowels
  • 3/4" nuts
  • Scrap 3/4" stock 
Photos:

Original stand with miter saw mounted to it.
I used the brackets to attached the 3/4" ply base.  
 
 
Here is a shot of the mounting brackets attached to the 3/4" ply wood.  I used the provided mounting screws and counter sunk the heads so that it was flush on top.
 
 
Here is an overall view with the fence on top. I want to mention that for the fence (seen on top of the router table ) I cut out notches for the router bit to pass through. I will talk more about the fence later.
 
 
I originally just mounted the router to the table top (with out a cut out).  However,  the router bits would not have protruded through the top enough for the projects I was working on and I couldn't access the clamp/adjustment ring easily.  So, I removed the original plate from the router and made a new one out of 1/4" ply wood.  It was surprising sturdy.  I didn't have to reinforce it.  Yes,  I realize they make steel plates for this purpose but I didn't want to spend the money and it worked just fine.  I then cut a hole in the table top. 


Here you can see the cut out where I drop the router into place (view from the top).  I undercut the hole ever so slightly and sanded the edges of the hole at approximately a 15 degree angle.  This was so the ply wood on the router will get wedged into place.  You can also see the top of the 2x4s I used as a stop for the router plate.  I used simple wood screws for attaching them, making sure the heads were below the surface of the table top.  Then drilled 2-1/4" holes for machine screws as kind of a "set screw" for fine adjustment.   I counter sunk the holes and placed 1/4" nuts inside the counter sinking.  I could only do this for the 2x4 show at the bottom of the picture.  For the top one I had to scab on a piece of scrap pine stock.  This was because the 2x4 on the bottom is directly over the main support beam of the stand.  I did this on purpose.  Since the 2x4 is wedged between the main beam and table top, it eliminated any deflection in the area of the router.
 
 
This is a shot from underneath.  You can see where the "set screw" pokes out the bottom of the scab on allowing for fine adjustment of router depth. The set screws in the 2x4 closed to you in the picture is actually counter sunk into the beam.  It provided and extra bit of stability to the screw.    
 
 
Here is a shot with the router in place and level.  I can run pieces over the top with out a problem.  I was actually kind of surprised how well it works. 
 

This is a shot of the fence construction.  I used 3/4" ply for the fence construction with dowels for assembly.  It took more time to use dowels but I think it was worth it. It ensured everything was square and fit up tight.  To get the dowels to line up correctly I used a "Milescraft" jig.  Before I fit everything up I cut notches in the bottom and the face so that the router bit could pass through (see pictures above for notch)
 

Here is a shot of the gluing process.  I used 4 fins total.  Made for a real solid piece.
 
 
This is a shot of the clamping mechanism for attached the fence to the table. I had originally planed to clamp vertically to the board but I forgot that the mounting brackets were too close to the edge.   So,  I decided to do it horizontally.  To accomplish this,  I drilled a hole 1/4" through a piece of 3/4" scrap I had lying around.  I then counter sunk a hole such that a 1/4" nut would fit into the piece of wood.  I originally tried to secure it using only wood filler.  That didn't work so well.  So I cut the piece in half and glued it back together such that the nut was in between the two glued pieces.   I the cut a piece of 1/4" ply for the handle, drilled a 1/4" hole through it, placed the carriage bolt through it and then attached the nut to the bolt.  It made for a real tight fit.  You could now use the handle to spin the bolt. 
 
 
Here is a side view of mechanism.  I drilled a 1/4" hole partially through a piece of pine stock I had lying around and placed it on the end of the 1/4" bolt.   This was to spread the clamping force out so that I wasn't chew up the edge of the table top.
 
 
Here is a shot above the clamp.  I used to wood screws to attach the mechanism.  I didn't care about making the top flush because there was nothing it would be sliding on.  It provides adequate clamping.  That being said, it's not as sturdy as if I could clamp vertically but it will do the job. 

Other Notes:
  • I also bought an external switch so that I could turn the router on/off with out having to go underneath.
  • I have used it a couple times with no real issues.  I will be making a filter for the computer this weekend so I will update this blog based on those findings.

Future Enhancements:
  • Sealing the wood somehow
  • Vacuum port
  • Mounted switch
Things Learned:
  • Sanding to get things perfectly square takes time.  I must have taken at least 3 layers of ply off of the bottom of the fence trying to get it level before I realized what I had to do.  I took a T-square and sanded one section at a time to get a perfect 90 degree angle between the face and the bottom.
  • Predrill, predrill, predrill.  I used wood screws in some locations that were really close to an edge as well as through some thin material.  Predrilling these holes was key.  Yes, it was a pain in the butt, but I thin it was worth it in the end.
  • Keep it simple!   I was going to make a router lift for this project, but I felt that it would have added a level of complexity that wasn't really necessary.  Especially because this tool is designed to be taken down and stored when not in use in addition to the router having built in adjustment capabilities.  Now if it was a permanent fixture in the garage that would have been a different story.  I probably would have made a lift for it.


Monday, January 6, 2014

Introduction

My wife and I recently bought a house.  Therefore,  I now have the space to start building all of the ideas I had in my head.  As I start taking on some of these projects, I realized that I do a lot of googleing to see how other people built similar projects.  This blog is an attempt to give back to the internet community.  While I got inspiration from other people, each job is slightly "custom".    I figure I would list some of the pitfalls in the projects to help others in their endeavors. 


Custom Computer Case

Background:
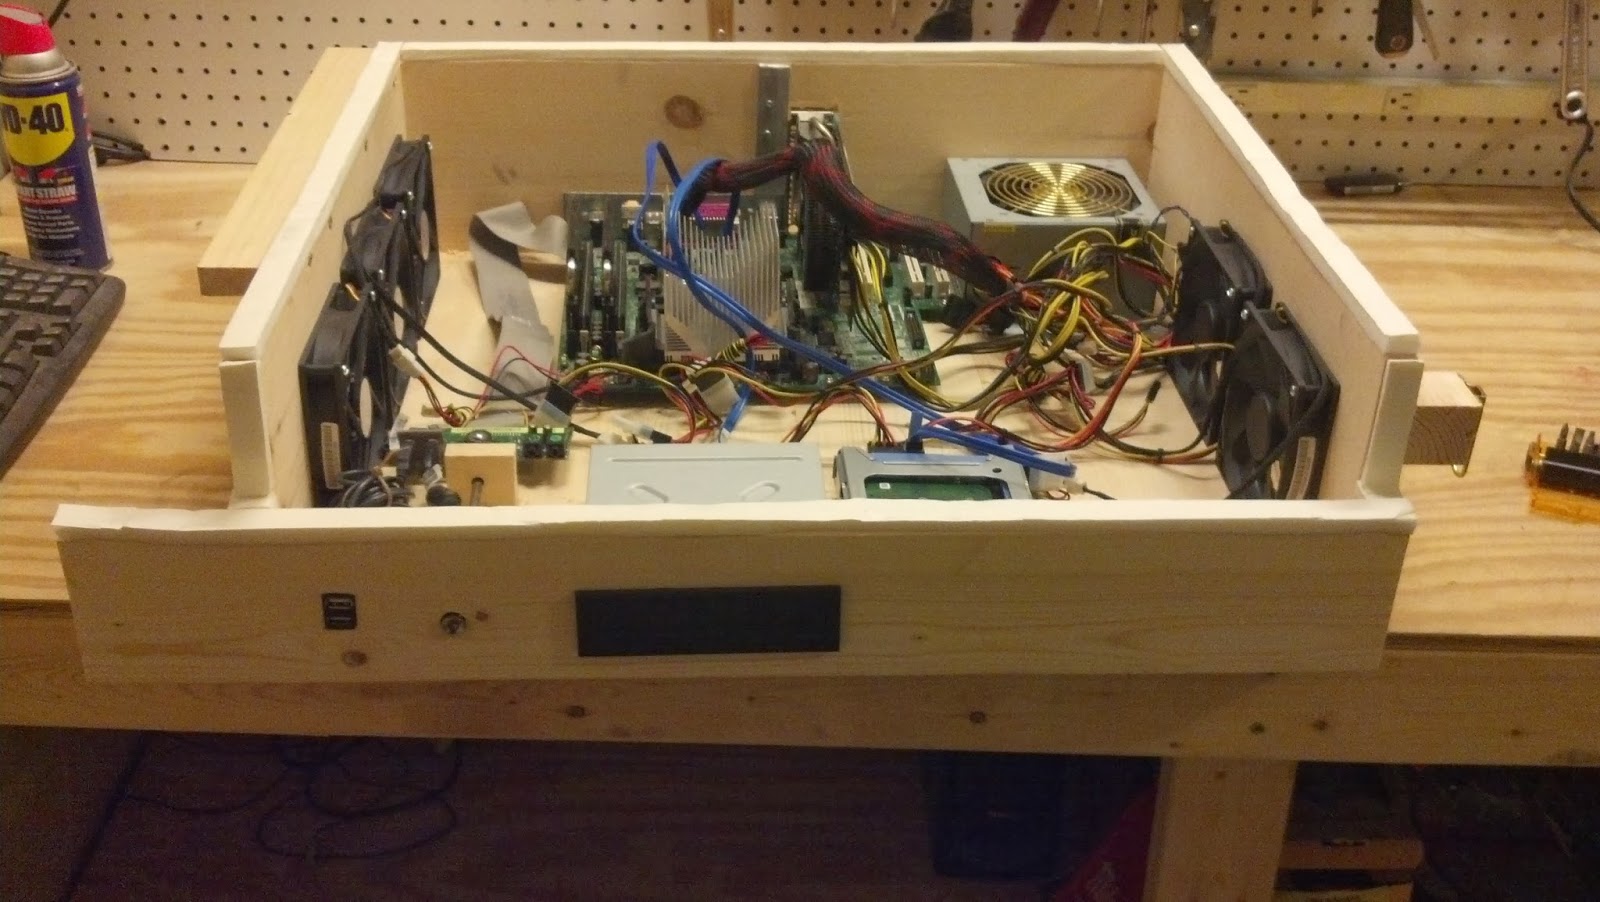
I recently built a work bench in my garage and wanted to be able to have a computer there.  The reason being is so that I can use AutoCAD and have the ability to look up parts, plans, calculator,  stream music etc.  I had an old dell computer laying around and decided to use it in the garage.  I mounted the LCD to the work bench and placed the tower underneath.  The problem was that it was taking up too much room.  So I decided to build a custom case that is mounted under the workbench.  Below are some of the picture of the build process. 


Materials:
             Dell computer case components.
             Pine boards.
             Motherboard standoff pins.
             Glue and various screws.
             Trunk latches.
             5-120mm case fans.

Photos:

Overview with out wires attached.

Cutouts in the back for power supply, video card and peripherals.
I had to over cut the hole for the video card so that I could remove it later without removing the entire mother board.

3-120mm Intake Fans
I used 4 1/8" diameter hole saws to cut the holes for all the fans.  To minimize chipping,  I placed a layer of sacrificial 1/4" plywood on each side.

I didn't use screws for the box.  All the corners are lock rabbet joints.  I created the joints using a table saw with a standard blade.  I realize I could have used screws just as easy, but I wanted this to be practice for the future.

2 - 120mm Exhaust Fans 
Notice the trunk latches.  These were used to attach the case under the work bench on this side.

I attached a piece of pine to the left side of the box.  This will support the box on the left side.

Front Panel
 2 USB ports, custom power button, DVD drive.  The USB ports are just cables that are extended from the Dell front panel.  For the DVD drive I cut a hole with a jig saw that was just big enough for it.  I then slid the DVD drive as far as it would go.  There was about 1/8" of flashing around it.  Looked pretty good.

Notice where the power button is.  I had to create a custom power button because the front panel ribbon was too short.  For this I drilled a 1/4" diameter hole for a 1/4" rod.  Then cut the power button off from the case and attached it to the rod with superglue.  Then counter sunk the hole to fit the power button.  The rod extends to the power switch on the Dell front panel assembly.  In this picture you can see the hard drive next to the DVD drive.  For the hard drive, I cut out the mounting bracket from the existing computer case.

Here you can better see the piece of pine I attached to support the left side of the computer case.

Under The Work Bench
  I attached a ledge to support the piece of pine attached to the computer case.

Trunk Latch Attachment.
I had to line up the block and drill two holes through the top of the bench. Then,  I started threading the screws from the top of the workbench through the predrilled holes until they breached the bottom.  Then,  lined up the block and continued screwing.  This block is actually 1/2" shorter then the next block.  That way when you rotate the case to remove it, it doesn't bind.
 

Trunk Latch Attachment

Fully Assembled
I put weather stripping around the top to ensure an air tight fit.

Installed
Under my work bench.
Overview Of The Completed Work Bench.
You can see that I now have plenty of space from my tools underneath.
Other Notes:
I use a wireless keyboard and mouse.  So I can use the full bench top if needed.
Everything is removable/upgradeable.
It sounds like the work bench is taking off because of all the fans.
 
Future Enhancements:
Removable filter for the fans.
Second monitor.

 
Things Learned:
  1. Dell computers are very proprietary in how the attach components as well as the components they use.  This made it difficult when it came to the front panel attachment and the mounting of the cpu heat sink.
  2. Making joints is somewhat difficult with a table saw and a standard blade.  I've recently gotten a router and will be making a router table soon.
  3. Always dry fit things before gluing.  I had to remake the case twice.
  4. Take your time when using a jig saw.  It will chip less.
  5. Never underestimate how long something will take.
  6. Practice, practice, practice.  I think of every bit of saw dust as experience points gained (Credit to Chuck for the analogy).
  7. 5 fans probably are not necessary.